A/B test CMS authored content with Netlify Edge Functions
In a previous post, I demonstrated how to A/B test different page layouts on the same user-facing URL using Netlify Edge Functions. But what if you want to run an A/B test on a more granular level, such as changing the wording of a hero banner, without creating new page layouts and rewriting to different URLs, and ensuring your authors stay in control of the content?
Split test content controlled by your editors
While it’s possible to use edge functions to update page content for an A/B test by manually rewriting content in code, in larger organizations with multiple teams this could be more difficult to scale. Many Content Management System (CMS) providers offer the ability to store content in multiple areas — or spaces — of your CMS, which you can access with different API keys. Different spaces may be used for preparing content for a feature branch release, localization, A/B tests, and more. By providing a dedicated testing ground in your CMS, developers can focus on writing the code, whilst content authors remain in control of the content.
In this code example, we’ll look at how you can A/B test messaging on a home page hero banner by using content from a separate area of your CMS. The following assumes that:
Your home page is statically generated at build time;
Your site fetches data from a CMS at build time;
Your home page is served at the root of your site (
/);Your CMS has the capability to store content in separate areas or spaces that can be fetched with different API keys and access tokens;
You have configured a “test” space in your CMS to deliver content in the same way as your production space;
Your site is hosted on Netlify.
Assign users to test buckets using browser cookies
At the root of your project, create a netlify directory if you don’t already have one, and inside that, create an edge-functions directory. Inside that, add a new file called abtest-homepage-hero.ts. You can write Edge Functions in JavaScript or TypeScript; in this example we’ll be using TypeScript.
Add the following code, in which an edge function and config object is exported, configured to run on the home page only (/), and a test bucket cookie named home_page_hero is found or set. For a more in-depth explanation, the setup is described in more detail in the previous post: How to split traffic and A/B test different page layouts on the same URL.

// netlify/edge-functions/abtest-homepage-hero.ts

import type { Context, Config } from "https://edge.netlify.com";

export default async (request: Request, context: Context) => {
  // look for existing "home_page_hero" cookie
  const bucketName = "home_page_hero";
  const bucket = context.cookies.get(bucketName);

  // return here if we find a cookie
  if (bucket) {
   //...
  }

  // if no "home_page_hero" cookie is found,
  // assign the user to a bucket
  // in this example we're using two buckets (default, new)
  // with an equal weighting of 50/50
  const weighting = 0.5;
  // get a random number between (0-1)
  const random = Math.random();
  const newBucketValue = random <= weighting ? "default" : "new";

  // set the new "home_page_hero" cookie
  context.cookies.set({
    name: bucketName,
    value: newBucketValue,
  });

  // ...
}

// this edge function will run on the home page
export const config: Config = {
  path: "/",
};
Fetch data from your CMS for the test bucket at runtime
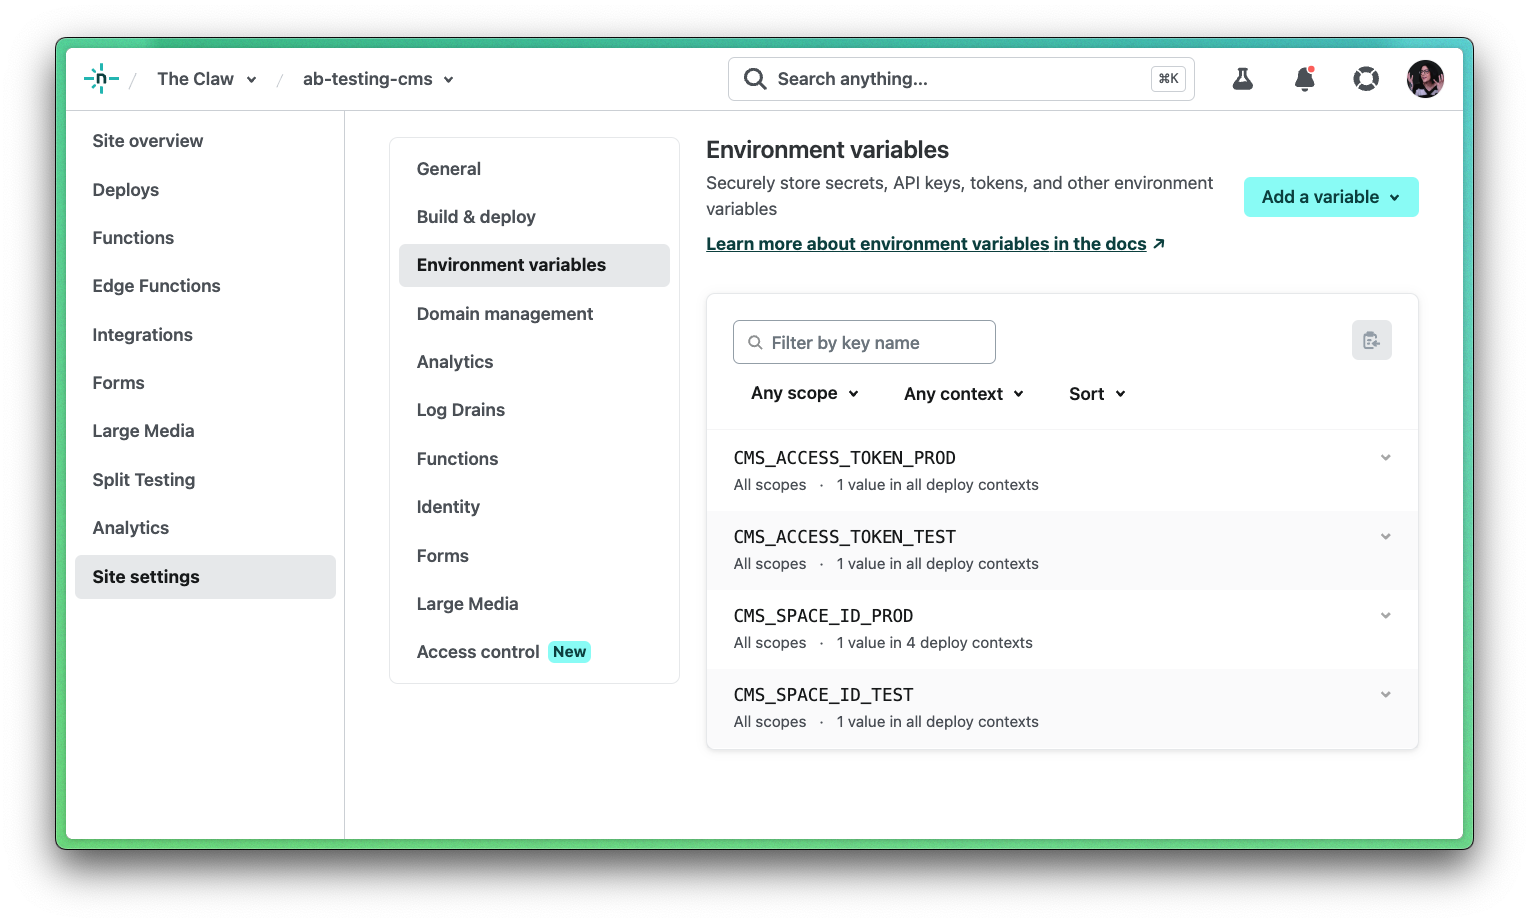
If you’re already fetching data from a CMS at build time to pre-generate your site pages, you’ll be familiar with using environment variables. Add the necessary environment variables for your test CMS space to allow you to fetch alternative content for the A/B test. The example below shows four environment variables, two for production and two for the test space.

Netlify Edge Functions have access to the Netlify global object, which you can use to manage environment variables at runtime. The code below demonstrates how to get two environment variables required to access data in the test environment, and provides boilerplate for how you might fetch that test content. Your method will vary depending on the CMS you are using.
Additionally, the code now demonstrates how to return the unmodified HTTP response should the value of the home_page_hero cookie be default.

// netlify/edge-functions/abtest-homepage-hero.ts

  import type { Context, Config } from "https://edge.netlify.com";

  export default async (request: Request, context: Context) => {
    const bucketName = "home_page_hero";
    const bucket = context.cookies.get(bucketName);

+   // get stored environment variables for test content
+   const CMS_SPACE_ID_TEST = Netlify.env.get("CMS_SPACE_ID_TEST");
+   const CMS_ACCESS_TOKEN_TEST = Netlify.env.get("CMS_ACCESS_TOKEN_TEST");

    if (bucket) {
+     if (bucket === "default") {
+       // return unmodifed HTTP response
+       return;
+     }

+     // fetch test content from CMS
+     // this is a boilerplate example and your method
+     // and query will vary
+     // fetch only the content you need
+     const testContent = await fetch(`https://cms.url/spaces/${CMS_SPACE_ID_TEST}`, {
+       headers: {
+         Authorization: `Bearer ${CMS_ACCESS_TOKEN_TEST}`,
+         "Content-Type": "application/json",
+       },
+     });

+     const jsonData = await testContent.json();

+     // ...
    }

    const weighting = 0.5;
    const random = Math.random();
    const newBucketValue = random <= weighting ? "default" : "test";

    context.cookies.set({
      name: bucketName,
      value: newBucketValue,
    });

+   if (newBucketValue === "default") {
+     return;
+   }

    // ...
  };

  export const config: Config = {
    path: "/",
  };
Modify the HTTP response using HTMLRewriter
Now we have the content from the CMS, it’s time to modify the HTTP response if the home_page_hero cookie value is new. In your HTML, add a unique identifier to your existing hero banner headline, or whichever element contains the content you’d like to test. In these types of tests, I prefer to target elements using data attributes rather than CSS classes in order to separate concerns. This example shows the data attribute data-hero-banner-headline added to an H1 element.

<!-- index.html -->

<h1 data-hero-banner-headline>
  The original unmodified headline in the original HTTP response
</h1>
There are a number of ways we can modify the HTML response, including by parsing the HTML as a string and finding and replacing using a regular expression. For this example we’re going to use Cloudflare’s HTMLRewriter which offers us the ability to target and modify the HTML response with the kind of JavaScript syntax we’re familiar with using in the browser. This is imported at the top of the file.
The additions to the code example below demonstrate:
How to grab the next HTTP response in the chain in order to be modified;
Using HTMLRewriter to target the H1 element via its data attribute;
Modifying the content of the H1 element with the data from the test area of the CMS we fetched earlier;
Returning the transformed response (make sure you do this in two places, you may want to write a utility function to keep your code DRY).

// netlify/edge-functions/abtest-homepage-hero.ts

  import type { Context, Config } from "https://edge.netlify.com";
+ import { HTMLRewriter } from "https://ghuc.cc/worker-tools/html-rewriter/index.ts";

  export default async (request: Request, context: Context) => {
    const bucketName = "home_page_hero";
    const bucket = context.cookies.get(bucketName);

+   // get the next HTTP response in the chain to be modified
+   const response = await context.next();

    // get stored environment variables for test content
    const CMS_SPACE_ID_TEST = Netlify.env.get("CMS_SPACE_ID_TEST");
    const CMS_ACCESS_TOKEN_TEST = Netlify.env.get("CMS_ACCESS_TOKEN_TEST");

    if (bucket) {
      if (bucket === "default") {
        // return unmodifed HTTP response
        return;
      }

      // fetch test content from CMS
      // this is a boilerplate example and your method
      // and query will vary
      // fetch only the content you need
      const testContent = await fetch(`https://cms.url/spaces/${CMS_SPACE_ID_TEST}`, {
        headers: {
          Authorization: `Bearer ${CMS_ACCESS_TOKEN_TEST}`,
          "Content-Type": "application/json",
        },
      });

      const jsonData = await testContent.json();

+     // modify the hero banner title in the HTTP response
+     // select the element by data attribute or another selector
+     // rewrite the inner content with the new headline from
+     // the CMS test space
+     return new HTMLRewriter()
+       .on("[data-hero-banner-headline]", {
+         element(element) {
+           element.setInnerContent(jsonData.headline);
+         },
+       })
+       .transform(response);
   }

    const weighting = 0.5;
    const random = Math.random();
    const newBucketValue = random <= weighting ? "default" : "test";

    context.cookies.set({
      name: bucketName,
      value: newBucketValue,
    });

    if (newBucketValue === "default") {
      return;
    }

+ /**
+  * Finally, return a transformed response when the value
+  * of the cookie is 'test'
+  *
+  * 1. Fetch content as above
+  * 2. Rewrite HTML response as above and return
+  * 3. You may want to write a utility function
+  *    to keep your code DRY!
+  */
  };

  export const config: Config = {
    path: "/",
  };
Track your test variants in your analytics tool
In order to track which hero banner messaging performs better in the A/B test, you’ll need to add some extra information to your analytics tooling. Ultimately, there will be a number of ways this can be achieved depending on your architecture and tooling. If you’re using Google Analytics, you can add an extra bit of information to your tracking scripts as described in a previous post.
Bonus content: use environment variables to control which A/B tests are running
To give content authors and marketers even more control over which A/B tests are live, you could go one step further and use environment variables to control which tests to account for in your edge function code. This could be as straightforward as checking for an environment variable at the top of the edge function, and returning early if the value of the variable is off, like so.

const HERO_BANNER_TEST_STATE = Netlify.env.get("HERO_BANNER_TEST_STATE");

if (HERO_BANNER_TEST_STATE === "off") {
  return;
}
Wrapping up
In a large organization, it’s essential to empower different teams to do their jobs without too many dependencies or blockers. Whilst this example shows how content authors and developers can work in parallel to execute a granular A/B test, this is only scratching the surface of what a modern composable architecture is capable of in terms of how you can experiment, iterate and ship new features faster. To learn more about what’s available to unlock, check out the official Netlify Edge Functions documentation.
Originally posted on www.netlify.com
